Sublime
Photo -
Equipment
I guess
I'm a bit of an equipment junkie, having owned quite a variety of different
camera systems
over the years. With the 35mm SLR systems,
I have always owned just one system at any given time. Here is the list
- from my first 110 camera (given to me in 1978 when I was 13), to my current
Canon EOS-30D system:
Kodak 110
format rangefinder
Vivitar 35mm rangefinder
Minolta X-700
Nikon FE-2
Olympus OM-4
Canon T-90
Canon EOS-Elan
Nikon F3/HP
Arca Swiss 4x5 studio camera
Linhof Technika 4x5 field camera
Pentax 67II Medium Format
and now the digital cameras...
Nikon CoolPix 800
Olympus C-4040
Nikon CoolPix 5400
Canon PowerShot Pro1
Canon EOS-20D Digital SLR
Canon EOS-30D Digital SLR
Digital SLR System
As of mid-September
2004, I have been shooting 100% digital-capture with Canon
digital SLR's, first an EOS-20D and now an EOS-30D as my primary camera,
and the Canon
PowerShot
Pro1
as a backup. My transition
to 100% digital has occured fully 1-2 years sooner than I had expected. After
testing out the new EOS-20D, making some 12x18 inch prints and comparing
them to what I was used to from my medium format system, I was so impressed
with the image quality that my mind was made up.
While the ultimate
resolution of the EOS-20D (8 megapixel) is certainly less than that of a
high-end medium format film scan, the almost total lack of grain on the digital
images allows them to be printed much larger than expected, given their modest
file size. Depending on the subject matter, at times I do find that prints
over 16x20 inches, despite looking sharp overall, may sometimes show a
slight
lack
of resolving
power when compared to the high-resolution medium or large-format film scans
I have gotten used to over the years. However, one huge advantage is that
the
digital
images (captured as raw data,
not
jpeg)
show
a
dramatic
improvement
in dynamic
range with significantly increased shadow and highlight detail when compared
to the transparency film that I had been shooting. In addition, high ISO
photos are much cleaner than their film counterparts.
All in all, I find
my new Canon system to offer far more flexibility, in a wider range of
photographic situations, than the medium format system I was shooting with
previously.
In 35mm
terms, I am now carrying the equivalent lens range of 16mm (rectilinear)
up to almost 900mm (!) with my EOS-20D
system. When I was shooting with my Pentax 67II system, the 35mm equivalent
range was only
about 24mm
to
150mm. That is what I mean by flexibility! Even with this tremendous additional
focal length range, the Canon system is not much heavier or bulkier than
the Pentax system. In fact, if I take out the 400mm telephoto for longer
hikes, it is actually somewhat smaller and lighter than the Pentax!
One more interesting
thing to note is that my EOS-20D digital system is giving me far better results
that any scanned images from a 35mm film camera ever did. My reasons for
moving up to larger format film cameras from 35mm originally had to do primarily
with image smoothness, sharpness and the ability to capture subtle textures
without the film's grain becoming too intrusive when a photo was examined
closely or printed large. In most ways, these same advantages also exist
for me now when shooting with my
digital SLR.
As far as lenses for
my EOS-20D, I am using a Canon EF-S 10-22mm f/3.5-4.5 zoom, a Canon 35mm
f/2.0, a Canon 50mm f/1.8, a Canon 70-200mm f/4L (with
tripod collar), a Canon 400mm f/5.6L, a Canon
1.4x
II
Teleconverter and a Canon 12mm Extension Tube. I also now have a Sigma 15mm
f/2.8 EX fisheye
and it has already proven itself to be a superb lens - extremely flare-resistant
and very sharp. In addition, I use a Canon Angle-Finder
C for critical macro
focusing or shooting in awkward positions, such as when doing low-angle shots.
Since I am now shooting
with an EOS-30D as a primary camera, I had my EOS-20D converted to a pure
infrared capture camera by www.lifepixel.com -
they provided prompt service and excellent workmanship. With the converted
camera, handheld shutter speeds are possible and no additional lens-mounted
infrared
filter is required. After having experimented with a multitude of normal point & shoot
as well as digital SLR's over the last 5 years, tediously shooting infrared images with
dark filters requiring long exposures and tripods, I would say that at this point,
using a converted digital SLR has got to be the ultimate way of shooting
infrared!
For storage, my memory
cards of choice are Lexar's latest 1Gb and 512Mb 80x speed cards.
I have enough cards that I can go through a full day of heavy shooting without
running out of space. While traveling, at the end of each day I archive
my shots directly to DVD+RW discs using an EZPNP DM220 portable DVD burner.
In the past, I also used an Apacer Disc Steno CP-200 portable CD
burner.
After several extended photography trips, the Apacer burner has proven itself
to be 100% reliable and so far, the EZPNP DVD burner has also worked well
for me.
For a tripod, I still
use the "Frankenpod" I have described in the camera gear section below.
[top]
Camera
Gear
Note: Although
I am now shooting 100% digital (as of Sept. 2004) and have sold my Pentax
67II medium-format film
camera system, I thought I would keep this section in place for reference...
For traditional
film shooting, I am now exclusively using the Pentax 67II system. I
have a 45mm bf/4 ultra-wide,
a 75mm
bf/4.5 wide-angle,
a 135mm bf/4 macro and a 300mm
bf/4 telephoto lens. I also use a set of extension tubes, the TTL
prism, folding waist-level finder and the high-magnification finder. The
sharpness
and contrast
of Pentax's SMC coated lenses is superb, and the built in spotmeter
of the 67II is very convenient. I have abandoned my 4x5 cameras in favor
of
the
Pentax because it is so much faster to shoot with and for prints
up to 16x20, I don't
really notice a huge difference in sharpness. Since I am currently
shooting mainly landscapes, I have also abandoned my Nikon F3 (which
I did really
like). I often hike into back-country areas and try to keep my
camera backpack's weight
down. I probably wouldn't use a 35mm anyway, even if I dragged
it along - so why bother. For the type of landscape photos that I tend to
shoot,
I find 35mm
too grainy and seriously lacking sharpness and smooth tonality
on large
prints.
Since I really like
razor-sharp photos and am not a steady handheld shooter, I use a tripod on
virtually all my shots with the camera's mirror
locked up to minimize camera shake. The Pentax 67II has a pretty massive mirror,
and the camera has quite a "kick" when shooting handheld. I use a
set of Slik Pro 700DX tripod legs, made of an Aluminum-Magnesium-Titanium (AMT)
alloy. They are reasonably light, quite strong and have survived all the abuse
that I could dish out over the last several years. For a tripod head I use
a Gitzo 1377M magnesium alloy ballhead custom modified with a directly attached
Manfrotto 410 quick-release base - quite the "Franken-tripod" but
effective! This tripod configuration is the minimum strength that I'd recommend
for the
Pentax
67II. Even the Pentax's
focal-plane shutter (on its own) can cause camera shake at slow shutter speeds,
when using a lighter-duty tripod configuration.
On occasion, I have
also rented Fuji GX617 or Linhof Technorama 617 medium format cameras
for taking panoramic 6x17 format photographs.
[top]
Film
Note: Although
I am now shooting 100% digital (as of Sept. 2004) and have sold my Pentax
67II medium-format film camera system, I thought I would keep this section
in place for reference...
I almost always shoot with slide film. Nothing beats looking
at a large transparency (in true-colour) on a light-table and I must admit,
I kind of miss my 4x5 in that respect! Since I do all of my printing digitally
I, of course, need to scan my film as well. Scanning a positive transparency
is generally much easier and more accurate (in terms of colour reproduction)
than scanning a negative.
My current films of
choice are Fuji Provia 100F, Fuji Velvia 50 and recently the new Velvia
100F. Both Velvia 100F and Provia 100F are incredibly fine-grained and sharp
slide films, both beating the slower Velvia 50 in this respect. The colour
balance of Provia
100F
is wonderfully
neutral yet still quite punchy and saturated. It doesn't suffer from overly
blue shadows or overly magenta clouds like some other saturated slide films
and it reproduces skin tones quite naturally. For the ultimate in vivid colour
reproduction, Fuji Velvia 50 still reigns supreme. I have not shot Velvia 100F
much yet, but it does look promising as well and I am looking forward to
using it more in the future. When I see Velvia transparencies just after
having them processed, I am still frequently surprised at just how vivid
they are: my usual reaction is "wow!"
I use Provia 100F more
than Velvia because it has less contrast with more exposure latitude (making
it easier to scan) and often I find the
more neutral balance renders more pleasing images, especially in the desert
southwest. The desert scenery in Utah and Arizona is already so vividly coloured
that using Velvia often seems to me like overkill, since Velvia sometimes reproduces
an almost surreal colouration of the landscape. I primarily use Velvia
when
I want to exaggerate colour in an otherwise bland scene and/or emphasize subtle
colour differences.
[top]
Digital Imaging / Printing
For my computer, I use an Apple
Power Mac G4 with dual 1.25GHz processors, 2Gb
of RAM, 4 hard disks totaling 480 Gb, a LaCie ElectronBlue 19 III
monitor, a Wacom 4x5 graphics tablet, a FingerWorks iGesture Mini touch-pad
and a Microsoft Intellimouse Explorer. I have added an optional Pioneer
DVR-107
DVD-R burner
to my Mac and use
Fuji
CD-R
or DVD-R disks
for archiving my images. For the occasional 35mm scan I still need to do,
I use a Polaroid SprintScan 35/Plus and for scanning prints or low-res
scans of film, I use an old Agfa Arcus II flatbed scanner. For high resolution
film scans, I use either an Imacon Flextight 646 or a Nikon Super
CoolScan 9000 ED film scanner... one of the advantages of working at Beau
Photo, is having access to high end scanners!
For most of my personal print
output, I am using an Epson Photo R2400 inkjet photo printer. It produces
stunning print quality, boasts archival print longevity and make absolutely
gorgeous black&white prints. Occasionally I will have larger prints made
on an Epson Pro 4800 or 9600.
As far as colour-management goes,
I use a ColorVision SpyderPRO to calibrate my monitor, and for printer
calibration I use ColorVision ProfilerPRO software with the Color-Savvy
ColorMouse handheld spectrocolorimeter that is part of the ColorVision
Master Suite
Spectro
package.
I almost exclusively use Adobe
Photoshop (now up to version 9.0 - also known as CS 2) when it comes to
working with my digital images. There is not much I can't do with this
program
and it
runs wickedly fast on my dual G4. I can effectively work with files
that are upwards of 500Mb without any problems or significant slowdowns.
Apart from some levels, contrast or saturation tweaking, some occasional
dodging and burning
and
some
preprint
sharpening,
I usually
don't manipulate
my images
to any great extent.
I am, however, not a "purist"
- I feel that it is acceptable to enhance images slightly or retouch out
the occasional distracting branch
or powerline. One can significantly change the look of a photograph by
changing film types, printing papers or dodging and burning in the darkroom,
so why not extend this capability to the computer? However, I do not
condone passing off an altered or retouched image when that image is intended
for documentation
purposes (photojournalism, for example) and is not simply being used
as a fine-art image.
Here
is an example of an image that I did slightly more than my usual minimal
amount of work to: I decided that a shot I did in Lower Antelope Canyon,
Arizona, needed some extra help
after
having made a larger print and not being quite satisfied by the initial
results...
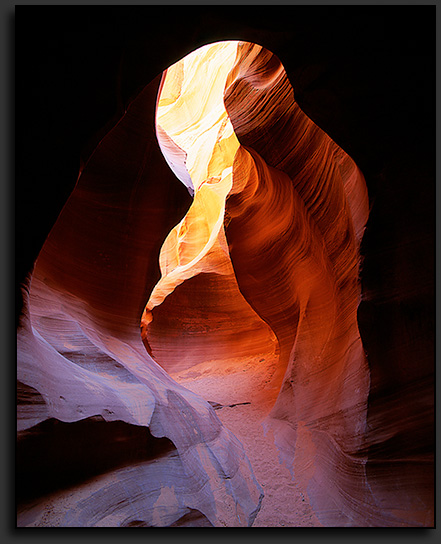
This shot was taken with my Pentax
67II and 75mm lens, the tripod column almost fully extended, one tripod
leg braced against the slot-canyon wall
and a shutter speed of 6 seconds at bf/16 with Fuji Velvia 50. Even though
the mirror was locked up and I used a cable release, that huge 6x7 shutter-curtain
probably did cause some shake. I was also pushing my depth-of-field since
I had a canyon wall quite close to the camera. In any case, the shot needed
some heavier-than-usual unsharp-masking in Photoshop to look snappy at 11x14
or larger print sizes. When I sharpened it to the degree I liked, I found
the sand
at the bottom of the canyon becoming too grainy and mottled for my tastes.
To try and solve this problem, I created a 50% opacity mask over just the
sand and tried sharpening the image again. That did the trick: the texture
of the canyon walls popped out nicely, while the sand was sharpened less
- just the effect I was looking for.
Also, there were some very blatant "Vibram" sole
boot-prints in the sand which were seriously distracting. I used the cloning
tool to carefully retouch these out (before sharpening) without overdoing
it and making the sand look artificially smooth. In the end, my final
print was a significant improvement, but still very natural
looking.
Whenever
I retouch a photo, no matter how severe the changes, I strive for a completely
natural look. Even knowing where the photo was retouched, I want
there to be absolutely no sign of manipulation - a difficult ideal to meet
sometimes,
admittedly. Newer versions of Photoshop (7.0
or 8.0) now have many additional tools that would have made working on
this image, even easier.
As far as the colour and contrast
of this image is concerned, the reproduction is actually quite close to
the original Velvia transparency which is very saturated and vibrant,
all by
itself! The light that filters into this slot canyon, reflecting off the
sandstone walls on its way down and getting warmer and warmer in tone,
is truly amazing...
[top]
Digital Photography
Very recently, I
have started to shoot with a digital camera and find that I'm using
my medium format camera less frequently. About a month and a half ago,
I tested out a Canon Powershot Pro1 digital camera and I was initially
quite
impressed
by the image quality. My first tests were done just shooting on-camera
JPEG images. While these images were of excellent quality, I did not feel
that they would quite meet my expectations if printed to a larger size.
Then
I started shooting some raw file tests (.CRW) and started to tweak the
resulting large 16-bit images in Photoshop. After some experiments,
I came up with an excellent sharpening action and began to make some
larger prints. I was stunned! After repeating a few shots around Vancouver
that
I had done on medium format film previously and comparing the resulting
prints, I came to the conclusion that this diminutive little 8 million
pixel "prosumer" camera
essentially
equals
my scanned medium format film on prints that are 16x20 inches or
less in size. While the absolute resolution is perhaps slightly lower,
raw files captured on the Pro1 show better shadow detail, slightly more
dynamic
range and less "grain" (at ISO 50) than
the slide film I was used to shooting. And no dust-retouching of scans
is required!
I was convinced and
decided to buy this camera for myself. In a tiny package that weighs a
fraction of my medium format Pentax, I now have a full 28-200mm zoom range
plus an add-on telephoto converter that gives me a 200-300mm zoom (all
in 35mm equivalent terms). The macro capabilities of this camera are also
impressive
as is the colour reproduction. Now that Adobe has updated their
Camera RAW plugin, I can acquire raw images directly into Photoshop and
I get even greater exposure latitude than using Canon's own software.
One of the great things about
shooting RAW files on a high quality digital camera like the Pro1, is the
ability to significantly change the look of the image. Do you want the
image to
look
like it was shot on Velvia? On Provia 100F? On Kodachrome? No problem!
The latitude of RAW files enables you to achieve just about any look you
could desire... all without having to decide beforehand what "film" you
are going to shoot.
I expect that I will still continue
to use my medium format camera for some time yet, but I now know that the
day is not that far off when I will give up on film and convert to shooting
only with digital cameras. Update! I am now 100% digital -
read [this]...
Note that all the non-infrared
images in my Recent Works: Oregon & California - June 2004 and Lower
Mainland and Washington State galleries were shot with the Canon PowerShot
Pro1. The B&W
infrared shots were taken with my CoolPix 5400 and a B+W 093 IR filter.
Once again, feel free to email me with any questions or comments at mander@sublimephoto.com.
Mike Mander, November 2005
[Digital SLR][Camera Gear] [Film] [Digital Imaging]
[Digital Photography]
[top]
[main
info page] [home]